
House Systems
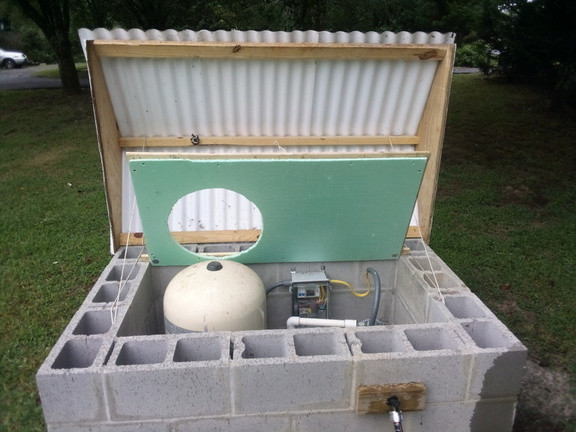
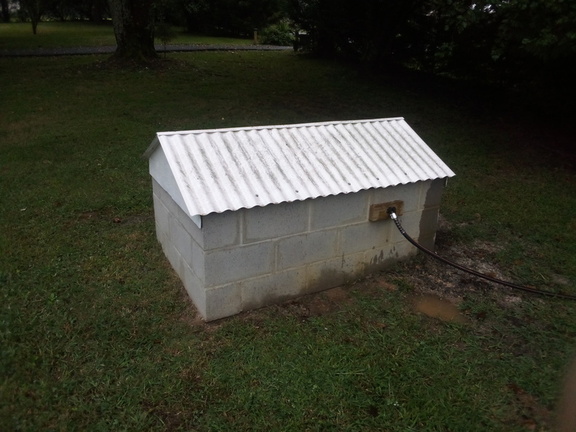
Well Water
-
Sediment filter
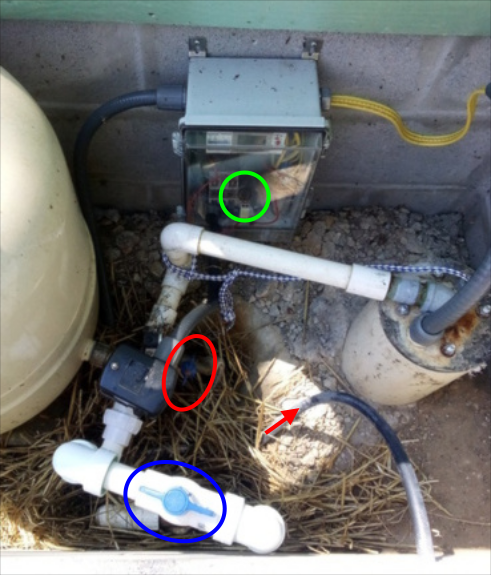
- If the water pressure is getting low (if you turn on a faucet and only a trickle of water comes out), the sediment filter inside the well-house may be getting filled. There are two ways to clean out the sediment filter (shown in red box).

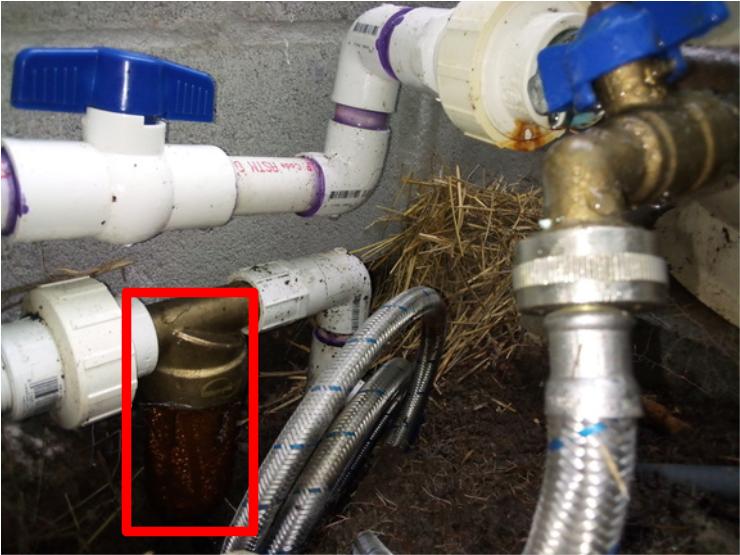
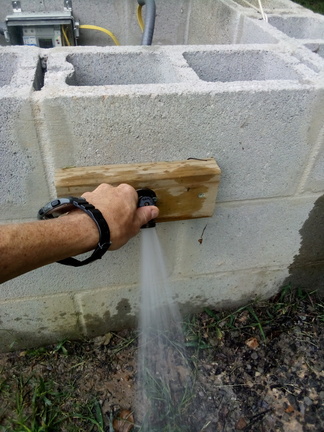
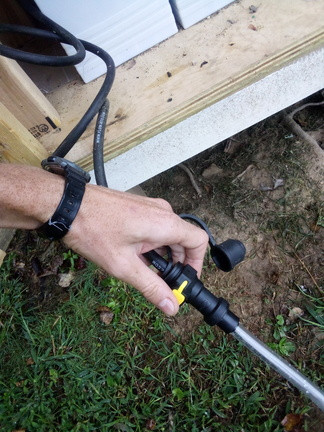
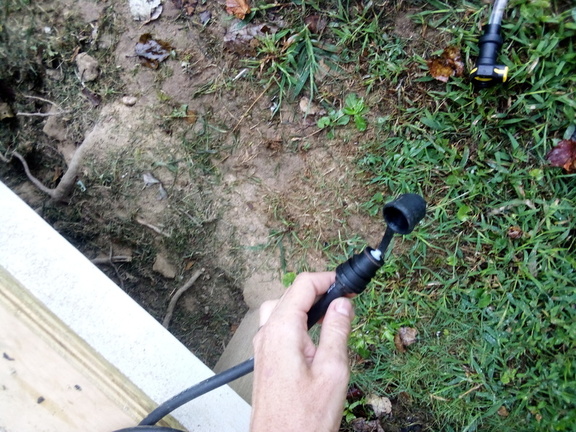
- Option 1: open the hose spigot on the side of the well house and let it run for a while. Sometimes you will see some reddish or brownish water come out. Even if it just runs clear, there may be sediment that is being cleaned out. There is a black flexible hose that connects from the bottom of the clear sediment filter bowl to the spigot. Using this spigot for general watering will help to continuously clean the sediment filter.

-
-
- Option 2: Inside the well house, turn the large valve (blue circle) perpendicular (sideways) to the pipe and turn the small valve (red circle) to inline with the pipe. This has the effect of bypassing the sediment filter and when the spigot on the outside of the well house is turned on, water flows backwards through the filter and out the rubber hose (red arrow). Turn on the outside spigot (like option 1) and let water flow backwards through the filter for a while.

- After the water runs clear for about 10 seconds, enable the sediment filter again by turning the large valve back to inline with the pipe and turning the small valve back to perpendicular (sideways) to the pipe.
-
-
Control box
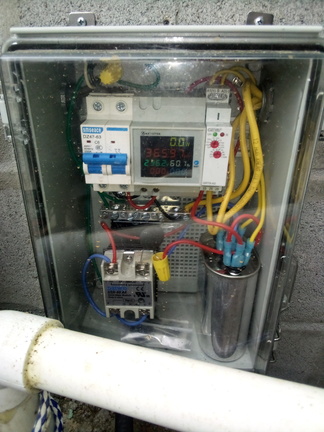
- If water has turned off, check to see if there is a solid red light and no green light on the Timer, which indicates the Timer has turned off the pump. While the pump is running in normal operation, there is a solid green light and a blinking red light.
- To reset the Timer :
- Flip the Breaker down (OFF)
- Wait a minute or two to let the NTC cool down
- Flip the Breaker up (ON)
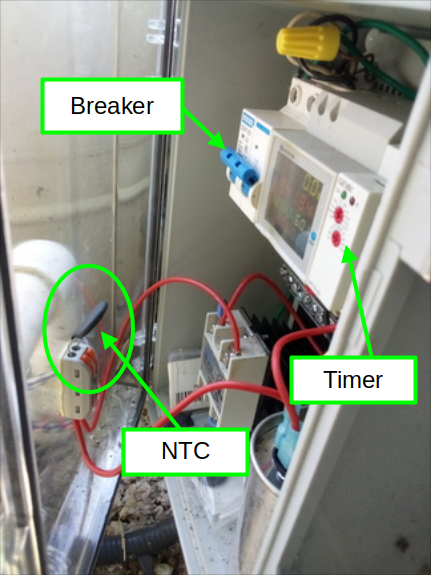
- General control box information:
- The Breaker (blue switch at the upper left) must be flipped up to provide power.
- At the upper-right, there is a Timer module (narrow white component with a green and a red light, on the right side of the screen with numbers). While the pump is running, there is s a solid green light and blinking red light. If the pump runs continuously for more than an hour, the there is a solid red light and the timer stops the pump.
- The Timer acts as a safety, to minimize water damage and wear on the pump, in case a pipe breaks or water is flowing uncontrolled.
- Watering the garden or grass for a long time can also cause the Timer to trip. Normally, if the water flow rate through the hose is slower than the flow rate of the well pump, then the pump will turn off periodically. Whenever the well pump turns off the Timer is reset, so the Timer only flips when the flow rate keeps the pump on continuously for an hour.
- The easiest way to reset the timer is to flip the Breaker down (OFF), then up (ON). You might need to wait a couple minutes before turning the Breaker on, to let the NTC cool. If the NTC is still hot, the inverter (back in the Solar Shed) might cut power because the NTC is allowing too much inrush current to be drawn by the pump motor. This is OK, just wait for the inverter to turn back on again. Usually the soft-start action of the inverter, when it first starts up again after a cutoff, is sufficient to turn on the well pump.
- To change how long the Timer waits before turning off the pump, you can change the settings of the red dials.
- The black coin-size disk (green circle) is an NTC or "Thermistor". This component provides a soft-start (slow ramp-up of electric current) to the pump motor. The NTC resists the flow of electric current when it's cold (when the motor is first starting) and then allow the flow with very little resistance when it gets hot (after the motor gets up to speed). Because of this, while the pump is running, the NTC will be too hot to touch. Because of the continual heating and cooling cycles, eventually the NTC will wear out and probably break in pieces. If this happens, there are spare NTCs in a small plastic bag at the bottom of the box. Lift up the orange levers holding the NTC and insert a new NTC.
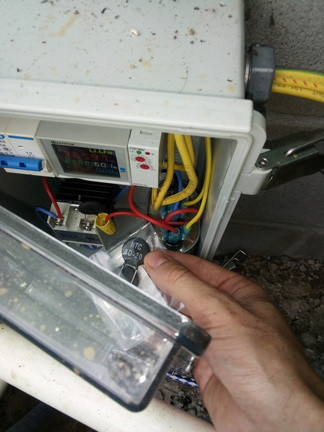
- If you need to get more NTCs, the NTCs currently being used have a rating of 8 amps (8A). If you can't find that size, an NTC with a lower rating might work, but might also fail sooner. It's not rocket science, so you could try different sizes of NTCs to see what works.
-
Well specs
- Depths
- Bottom of the well is 120ft (from memory of what the driller guys told us)
- Water at about 5 gal/min is at about 35ft.
- Water at about 40+ gal/min is at 105ft.
- Pump is at about 100ft, 20ft above bottom (from memory of what installer told us, one of the same guys who ran the driller).
- It's likely that water fills up pretty high in the well, all the way up to around the 35ft mark.
- Power supply
- 4000W 240Vac inverter located on inside-right wall of the white "solar shed".
- Does not have an option to connection to grid power.
- Breaker in solar shed and also in the pump control box inside the well house.
- Pump
- 240Vac
- 1/2hp
- 2-wire
- Depths

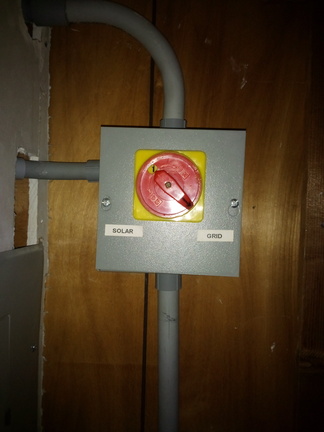
House Solar Switch
- The solar/grid power switch, main electrical panel, and sub-panel are located in the closet of the last bedroom on the left (north end of house).
- To switch between solar and grid power, rotate the red switch to align with the SOLAR or GRID labels.
- Most wall outlets and lights in the house are connected through a sub-panel that can be switched between solar and grid power.
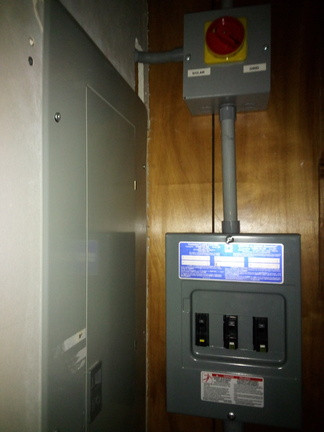
- Sub-panel breakers (left to right):
- 15A (GFCI, yellow): Upstairs bathroom lights and wall outlets, kitchen wall outlets, and master-bedroom and master-bathroom lights and wall outlets.
- 15A (AFCI, white): House lights and garage lights and wall outlets.
- 15A (AFCI, white): House wall outlets.
- Solar power only:
- Well pump: runs on power from the dedicated 240Vac 4000W inverter in the solar shed.
- Grid power only:
- 230Vac power from main panel (not connected through sub-panel):
- Central air conditioning and heating (HVAC)
- Dryer wall outlet (large 3-prong, south end of house).
- 115Vac power from main panel (not connected through sub-panel):
- Washing machine wall outlet (south end of house).
- 230Vac power from main panel (not connected through sub-panel):

Solar Panel Arrays
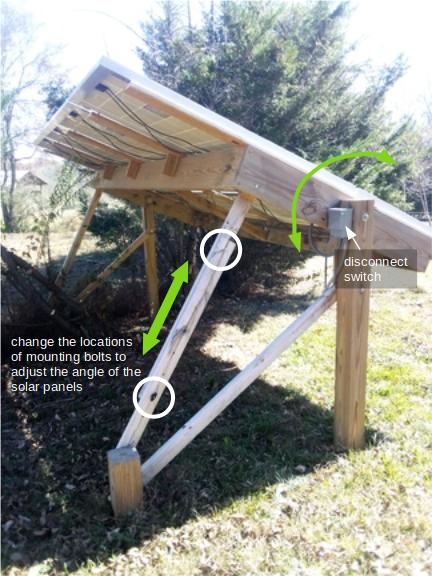
- Each solar panel array has a disconnect switch.
- All of the solar panel arrays are wired in parallel in a junction box on the back of the solar shed.
- The angle of the solar panel arrays can be adjusted as shown below:

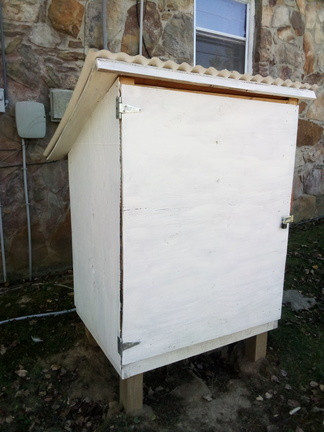
Solar Shed
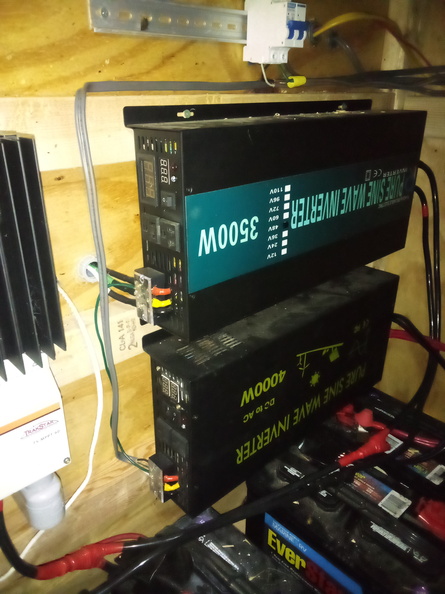
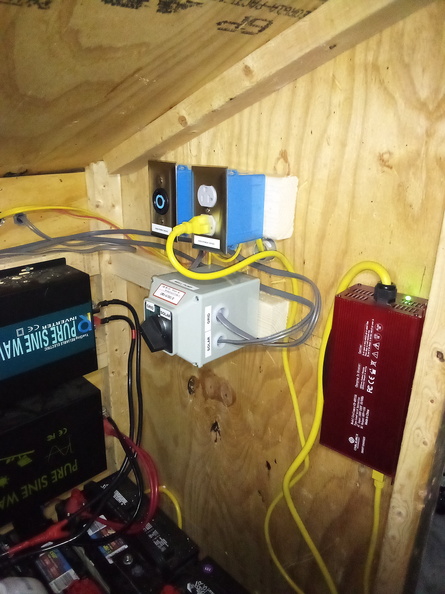
- The "Solar Shed" contains batteries, inverters, solar battery charge controller, and a wall-power battery charger (red box mounted on the door frame).
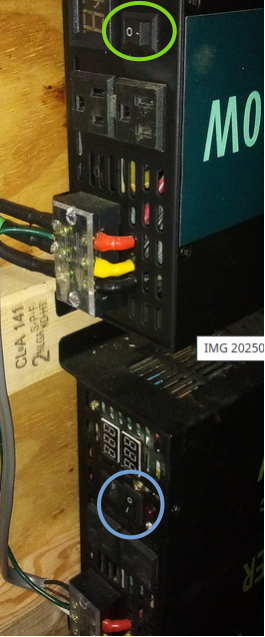
- To enable solar 120Vac power to the house (red switch above), the 3500W (upper) inverter must be switched on (green circle).
- To enable solar 240Vac power to the well pump, the 4000W (lower) inverter must be switched on (blue circle).


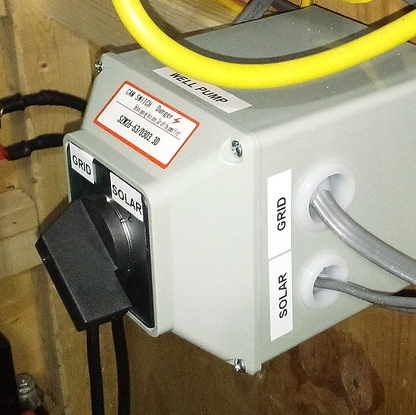
- The well pump can be switched between grid and solar power. Inside the Solar Shed is a switch marked "WELL PUMP" with "GRID" and "SOLAR" positions.

- When charging the batteries using the wall-powered battery charger (red box), a charging cycle can be restarted by unplugging the charger (yellow cord), waiting 20sec (or until the red light stops flashing), and re-plugging to restart the cycle.
- The 120Vac and 240Vac wall outlets in the Solar Shed are powered from the main panel in the house, connected to the grid.

Battery Maintenance
- The solar panel arrays are connected to the Solar Array Charge Controller, which converts the voltage of the solar panels (typically around 100Vdc), to the voltage of the batteries (48Vdc). The Large Battery Array is eight 6V batteries (6 x 8 = 48) and the Small Battery Array is four 12V batteries (12 x 4 = 48).
- The batteries are fairly maintenance-free, but the Large Battery Array needs some distilled water added every few months (possibly every month when it's hot).
-
The Small Battery Array is 4 of the 8 batteries I initially bought from Walmart. The Small Battery Array is connected in parallel with the Large Battery Array (bought later from Crown Batteries). The small array helps the Well Pump Inverter with bursts of current drawn by the pump motor.
- There is a squeeze-pump system to replenish distilled water in the Large Battery Array.
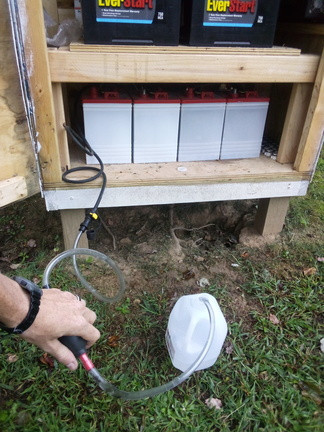

- It's best to add water when the batteries are fully charged. This would probably be in the evening or after dark, after a sunny day.
- Use the squeeze bulb to pump distilled water until it becomes too hard to pump any more. There are float valves inside the watering system that shut off when each battery is full of water.
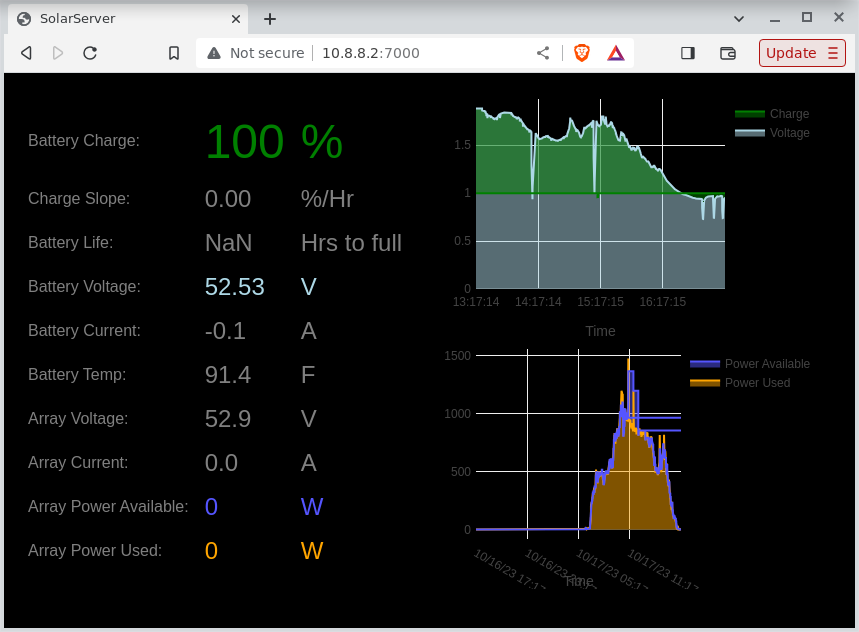
- Battery and power web-browser displayed graph


LAN & Battery Charge Monitor
- Solar charge controller (Morningstar TriStar TS-MPPT-60) web interface
- Accessible from home local area network (LAN)
- LAN URL: http://10.8.8.8/

- Custom graphed battery and power display
- Accessible from home local area network (LAN)
- LAN URL: http://10.8.8.2:7000/


Ferrous iron removal system
-
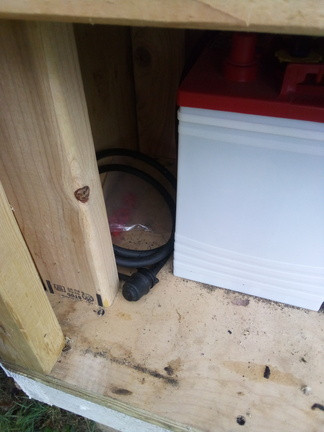
- White tank in the crawl space
- Nightly reverse-rinse cycle
- Iron builds up in the filter media inside the tank, so it has to reverse the process and rinse out every night
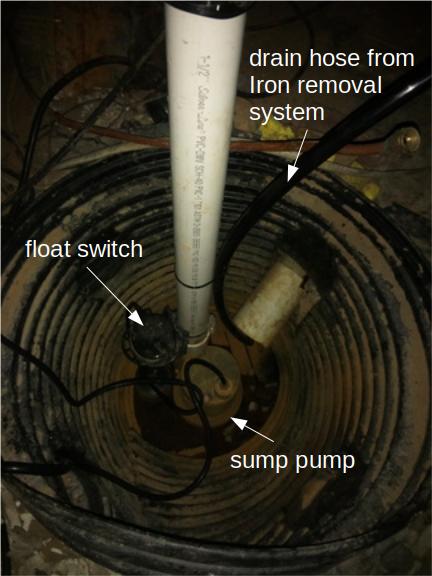
- The black tube is the drain hose, and is fastened in the sump pump bucket. This way the reverse-rinse drains into the ground at the sump pump, and if it fills up too much, the sump pump will pump it out.
- The reverse-rinse cycle is currently set to happen every night at 1:00AM
- White tank in the crawl space

Basement Water Removal
- Sump pump
- 1/2 hp, Home Depot brand
- Connected to PVC pipe that drains out under the back deck.
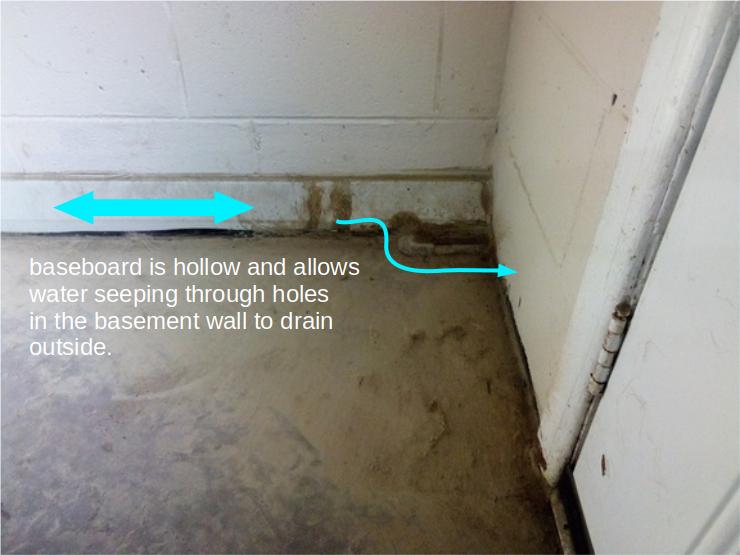
- Baseboard drain
- Beaver (basementwaterproof.com/products) basement waterproofing system


No Comments